They only define it.
Get it? It’s a pun. You’re welcome.
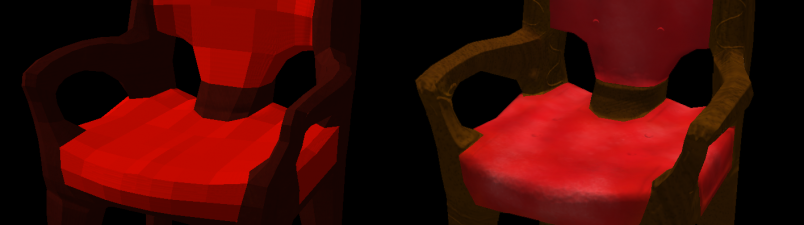
We’ve overcome our challenges with normal mapping of simple assets, and on that subject I have some thoughts. Since writing them helps me wrap my head around the process, here you go:
 When planning to use normal mapping to create the illusion of high poly count on low poly assets my preference has been to build for the low poly asset first, then duplicate the low polly asset and add the additional topology to the second object. I’ve experimented with the opposite (building the high poly first, and the low poly under it) but I find the process of poly reduction to be far more tedious than that of detailing. Since keeping our momentum up at the office is largely a function of staying motivated, edging out tedium wherever possible is a huge deal. Even a tiny reduction in tedium can translate to a considerable momentum gain just based on morale (this constituting my critique of Monroe’s 1205th axiom).
The trick is, Normal Maps can’t change the low poly object’s actual topology – they can give the appearance of smooth edges, of internally shadowed texture, and even concave or convex extrusions so long as those extrusions don’t need to parallax, or affect the silhouette. Don’t make a high poly asset with a different silhouette!
My process goes as follows (working in blender 2.63A):
- Generate the Low Poly Asset
- UV map the Low Poly Asset
- Duplicate Low poly with UVs
- Generate high poly topology on the duplicate object.
- Create materials for the high poly surfaces.
- Extort surface textures from artist.
- Mine the textures for normal mapped texture (using the process described at cgtextures)
- Apply the textures and normals to the various materials of the high poly model
- Bake the high poly (with all it’s subsurface textures and normals) to the low poly at roughly 3x the final expected resolution (this is to stand in for antialiasing, which the blender texture baker doesn’t seem to do).
- Save the baked files as .png and then re-size them in photoshop (being sure to normalize the normal map)
- Create a new material for the Low Poly mesh
- Apply the baked texture and Normals pngs to the low poly material.
- Export the object. Wala! Done!
Things to bear in mind:
- It’s tempting during step 4 to use a subsurface modifier to increase the poly count and “round” hard edges for a smoother look. I advise against this approach. Normal mapping has no effect on the asset’s silhouette. A subsurface mod will very likely alter that silhouette, especially if it has/had protrusions of any kind. You can work around this by using enough topography in your low poly to represent rounded edges semi-accurately, but subsurface mods and other methods that aggressively alter the low-poly silhouette should be avoided. Remember, your high poly mesh must have fundamentally the same silhouette as your low poly.
- If you’re using overlapping sub-mesh islands in your low poly, you will need to explode them away from each other so that the normal map baking process won’t be confused by the overlapping faces. Fortunately, if they really are islands, this should have no effect on your UV map, so you can put it back after you’ve baked the normals.
There are a lot of steps and little bits, but the results are extremely satisfying, and the work tends to fly by. Actually it’s kind of scary how quickly the time flies by. What day is it anyway? Is it day or night? Have I eaten? Well, anyway, back to work.